一、在你使用GLTFLoader加载gltf文件时,你会发现你只需要调用GLTFloader的load方法就可以在,回调函数中拿到Scene对象。所以当你调用GLTFLoader.load时就完成了整个加载解析过程。所以,我们从GLTFLoader.load开始了解整个GLTF文件的加载解析流程。
load源码如下:
  1
  2
  3
  4
  5
  6
  7
  8
  9
 10
 11
 12
 13
 14
 15
 16
 17
 18
 19
 20
 21
 22
 23
 24
 25
 26
 27
 28
 29
 30
 31
 32
 33
 34
 35
 36
 37
 38
 39
 40
 41
 42
 43
 44
 45
 46
 47
 48
 49
 50
 51
 52
 53
 54
 55
 56
 57
 58
 59
 60
 61
 62
 63
 64
 65
 66
 67
 68
 69
 70 load( url, onLoad, onProgress, onError ) {

        const scope = this;

        let resourcePath;

        if ( this.resourcePath !== '' ) {

            resourcePath = this.resourcePath;

        } else if ( this.path !== '' ) {

            resourcePath = this.path;

        } else {

            resourcePath = LoaderUtils.extractUrlBase( url );

        }

        // Tells the LoadingManager to track an extra item, which resolves after
        // the model is fully loaded. This means the count of items loaded will
        // be incorrect, but ensures manager.onLoad() does not fire early.
        this.manager.itemStart( url );

        const _onError = function ( e ) {

            if ( onError ) {

                onError( e );

            } else {

                console.error( e );

            }

            scope.manager.itemError( url );
            scope.manager.itemEnd( url );

        };

        const loader = new FileLoader( this.manager );

        loader.setPath( this.path );
        loader.setResponseType( 'arraybuffer' );
        loader.setRequestHeader( this.requestHeader );
        loader.setWithCredentials( this.withCredentials );

        loader.load( url, function ( data ) {

            try {

                scope.parse( data, resourcePath, function ( gltf ) {

                    onLoad( gltf );

                    scope.manager.itemEnd( url );

                }, _onError );

            } catch ( e ) {

                _onError( e );

            }

        }, onProgress, _onError );

    }
关注这段源码的第54行,前面的代码完成了文件的网络请求获取到二进制数据放在data变量中,然后调用scope.parse就是完成二进制数据转为Scene对象的方法。关注这段源码第3行scope其实就是GLTFLoader实例自身,所以这里调用的scope.parse就是GLTFLoader类中实现的parse方法,源码如下:
  1
  2
  3
  4
  5
  6
  7
  8
  9
 10
 11
 12
 13
 14
 15
 16
 17
 18
 19
 20
 21
 22
 23
 24
 25
 26
 27
 28
 29
 30
 31
 32
 33
 34
 35
 36
 37
 38
 39
 40
 41
 42
 43
 44
 45
 46
 47
 48
 49
 50
 51
 52
 53
 54
 55
 56
 57
 58
 59
 60
 61
 62
 63
 64
 65
 66
 67
 68
 69
 70
 71
 72
 73
 74
 75
 76
 77
 78
 79
 80
 81
 82
 83
 84
 85
 86
 87
 88
 89
 90
 91
 92
 93
 94
 95
 96
 97
 98
 99
100
101
102
103
104
105
106
107
108
109
110
111
112
113
114
115
116
117
118
119 parse( data, path, onLoad, onError ) {

        let json;
        const extensions = {};
        const plugins = {};
        const textDecoder = new TextDecoder();

        if ( typeof data === 'string' ) {

            json = JSON.parse( data );

        } else if ( data instanceof ArrayBuffer ) {

            const magic = textDecoder.decode( new Uint8Array( data, 0, 4 ) );

            if ( magic === BINARY_EXTENSION_HEADER_MAGIC ) {

                try {

                    extensions[ EXTENSIONS.KHR_BINARY_GLTF ] = new GLTFBinaryExtension( data );

                } catch ( error ) {

                    if ( onError ) onError( error );
                    return;

                }

                json = JSON.parse( extensions[ EXTENSIONS.KHR_BINARY_GLTF ].content );

            } else {

                json = JSON.parse( textDecoder.decode( data ) );

            }

        } else {

            json = data;

        }

        if ( json.asset === undefined || json.asset.version[ 0 ] < 2 ) {

            if ( onError ) onError( new Error( 'THREE.GLTFLoader: Unsupported asset. glTF versions >=2.0 are supported.' ) );
            return;

        }

        const parser = new GLTFParser( json, {

            path: path || this.resourcePath || '',
            crossOrigin: this.crossOrigin,
            requestHeader: this.requestHeader,
            manager: this.manager,
            ktx2Loader: this.ktx2Loader,
            meshoptDecoder: this.meshoptDecoder

        } );

        parser.fileLoader.setRequestHeader( this.requestHeader );

        for ( let i = 0; i < this.pluginCallbacks.length; i ++ ) {

            const plugin = this.pluginCallbacks[ i ]( parser );
            plugins[ plugin.name ] = plugin;

            // Workaround to avoid determining as unknown extension
            // in addUnknownExtensionsToUserData().
            // Remove this workaround if we move all the existing
            // extension handlers to plugin system
            extensions[ plugin.name ] = true;

        }

        if ( json.extensionsUsed ) {

            for ( let i = 0; i < json.extensionsUsed.length; ++ i ) {

                const extensionName = json.extensionsUsed[ i ];
                const extensionsRequired = json.extensionsRequired || [];

                switch ( extensionName ) {

                    case EXTENSIONS.KHR_MATERIALS_UNLIT:
                        extensions[ extensionName ] = new GLTFMaterialsUnlitExtension();
                        break;

                    case EXTENSIONS.KHR_DRACO_MESH_COMPRESSION:
                        extensions[ extensionName ] = new GLTFDracoMeshCompressionExtension( json, this.dracoLoader );
                        break;

                    case EXTENSIONS.KHR_TEXTURE_TRANSFORM:
                        extensions[ extensionName ] = new GLTFTextureTransformExtension();
                        break;

                    case EXTENSIONS.KHR_MESH_QUANTIZATION:
                        extensions[ extensionName ] = new GLTFMeshQuantizationExtension();
                        break;

                    default:

                        if ( extensionsRequired.indexOf( extensionName ) >= 0 && plugins[ extensionName ] === undefined ) {

                            console.warn( 'THREE.GLTFLoader: Unknown extension "' + extensionName + '".' );

                        }

                }

            }

        }

        parser.setExtensions( extensions );
        parser.setPlugins( plugins );
        parser.parse( onLoad, onError );

    }
这段代码的执行截止到第48行,完成了二进制流到json串的转化。下面是我使用了一个gltf模型文件进行调试时在第48行后面进行打印出的一个数据结果:
 如果你尝试用文本编辑器打开gltf文件,你会发现它其实就是一个json文本,下面是我在vscode中打开了一个gltf文件:
 关于gltf更详细的文件定义可以参看https://github.com/KhronosGroup/glTF
这里只将重要的文件定义内容展示:
关于gltf更详细的文件定义可以参看https://github.com/KhronosGroup/glTF
这里只将重要的文件定义内容展示:
 图片中为你描述了json结构中各个属性的含义,在后面会详细解释如何理解每个字段。
接下来让我们继续将视线回到threejs源码。拿到gltf中的json数据之后,50-60行将其传给GLTFParser的构造函数,60-116为解析过程准备需要的插件和扩展工具。最后一行调用GLTFParser.parse进行解析,源码如下:
图片中为你描述了json结构中各个属性的含义,在后面会详细解释如何理解每个字段。
接下来让我们继续将视线回到threejs源码。拿到gltf中的json数据之后,50-60行将其传给GLTFParser的构造函数,60-116为解析过程准备需要的插件和扩展工具。最后一行调用GLTFParser.parse进行解析,源码如下:
  1
  2
  3
  4
  5
  6
  7
  8
  9
 10
 11
 12
 13
 14
 15
 16
 17
 18
 19
 20
 21
 22
 23
 24
 25
 26
 27
 28
 29
 30
 31
 32
 33
 34
 35
 36
 37
 38
 39
 40
 41
 42
 43
 44
 45
 46
 47
 48
 49
 50
 51
 52
 53
 54
 55
 56
 57
 58
 59
 60 parse( onLoad, onError ) {

        const parser = this;
        const json = this.json;
        const extensions = this.extensions;

        // Clear the loader cache
        this.cache.removeAll();
        this.nodeCache = {};

        // Mark the special nodes/meshes in json for efficient parse
        this._invokeAll( function ( ext ) {

            return ext._markDefs && ext._markDefs();

        } );

        Promise.all( this._invokeAll( function ( ext ) {

            return ext.beforeRoot && ext.beforeRoot();

        } ) ).then( function () {

            return Promise.all( [

                parser.getDependencies( 'scene' ),
                parser.getDependencies( 'animation' ),
                parser.getDependencies( 'camera' ),

            ] );

        } ).then( function ( dependencies ) {

            const result = {
                scene: dependencies[ 0 ][ json.scene || 0 ],
                scenes: dependencies[ 0 ],
                animations: dependencies[ 1 ],
                cameras: dependencies[ 2 ],
                asset: json.asset,
                parser: parser,
                userData: {}
            };

            addUnknownExtensionsToUserData( extensions, result, json );

            assignExtrasToUserData( result, json );

            Promise.all( parser._invokeAll( function ( ext ) {

                return ext.afterRoot && ext.afterRoot( result );

            } ) ).then( function () {

                onLoad( result );

            } );

        } ).catch( onError );

    }
注意与前面GLTFLoader类中实现的parse方法区分,这里是GLTFParser中的parse。GLTFLoader.parse准备好json数据和需要的插件和扩展后,调用GLTFParser.parse来做最终的解析。 你可以看到这段代码的第54行,就是你在调用时传入的onLoad回调函数,层层传参至此,做最终的回调。而这里的result就是你想拿到的最终数据。 因为前面在GLTFLoader.parse中拿到gltf中的json数据之后,在那段源码的50~60行将其传给GLTFParser的构造函数,所以GLTFParser.parse这段源码第4行的const json = this.json。就是gltf中的json数据,通过传给GLTFParser的构造函数然后通过this获取到这里。
二、那么从这段源码第4行的json到第54行的result中间都经历了什么,让它从一个json最终转变成了你最终想要的场景对象了呢?
其实这个解析过程,就是你去理解这个gltf文件json格式的过程,我先为你讲解,我们应当如何理解gltf的json的一些关键字段。
1.首先是scene:是一个场景索引值,合理取值范围为scenes属性的数组长度,可以没有,默认值为0。
2.scenes字段:
一个对象数组,每一个数组项代表一个scene场景,我们会根据scene的索引值取对应的数组元素。比如这个例子:
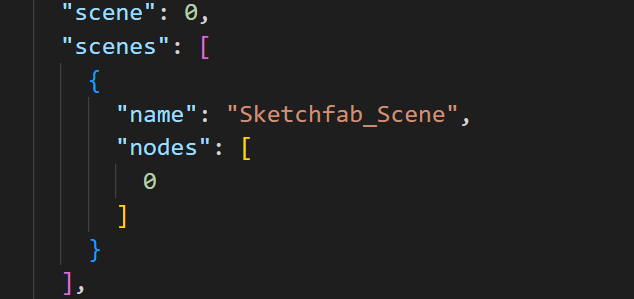 那scene索引就指向了这个name为Sketchfab_Scene,nodes索引为0的这个场景。
3.nodes字段:
nodes字段同样是一个数组,里面放置的就是在上面的举例中,所要解析的scene中nodes索引为0,我们要取得就是该数组得第0个元素。
那scene索引就指向了这个name为Sketchfab_Scene,nodes索引为0的这个场景。
3.nodes字段:
nodes字段同样是一个数组,里面放置的就是在上面的举例中,所要解析的scene中nodes索引为0,我们要取得就是该数组得第0个元素。
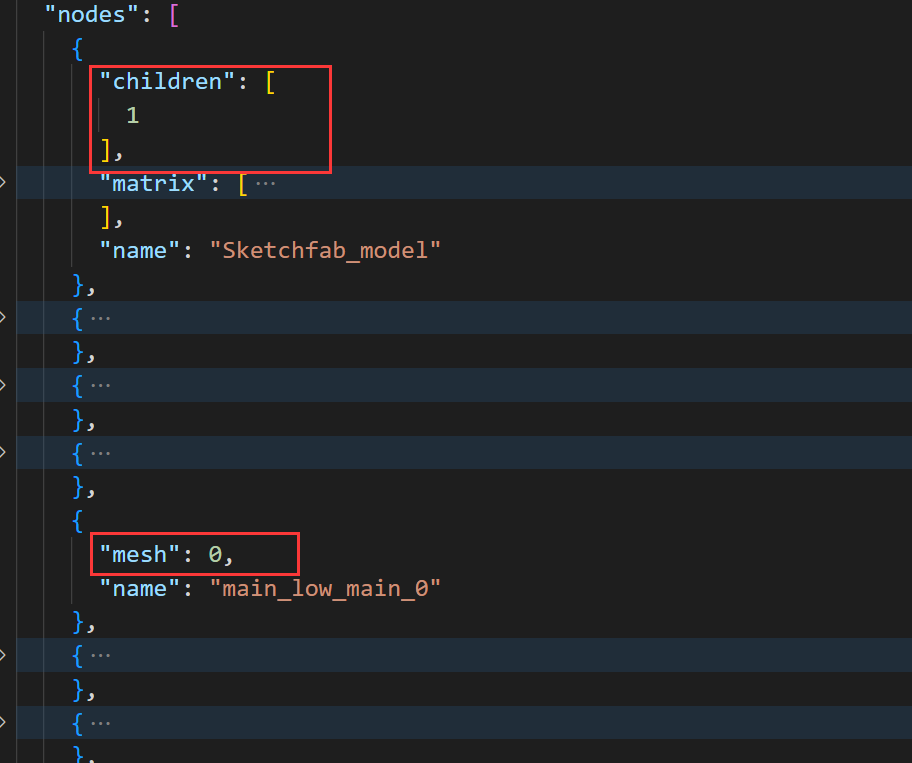 如你所见,这个字段就是一个对象数组,但是数组中可能包含得对象包括children, mesh, camera,skin等等不同的对象。mesh, camera,skin就是最终要渲染得内容,当然一般一个场景必然包含mesh,但未必有camera,skin。如果解析到的是这些对象,直接转去这些json字段中去取即可。但是children对象则需要根据children属性中的索引值,继续在nodes属性中去深度递归,查找替换。如这个例子,我们取得是第一个nodes节点,那么他是一个children,那就意味着这个节点有一个子节点,该子节点是nodes属性数组索引为1得节点(注意这里得1是编程中的索引1,也即数组得第二个元素)。然后按照树得深度递归去查找直到,子节点均为直接渲染属性如mesh。
4.meshs字段:
按照第3步中的递归解析,最终解析到直接渲染元素如mesh,可以参照3中图示的那条mesh数据,它索引值为0,也即这个要渲染的mesh指向了meshs字段的第一个元素:
如你所见,这个字段就是一个对象数组,但是数组中可能包含得对象包括children, mesh, camera,skin等等不同的对象。mesh, camera,skin就是最终要渲染得内容,当然一般一个场景必然包含mesh,但未必有camera,skin。如果解析到的是这些对象,直接转去这些json字段中去取即可。但是children对象则需要根据children属性中的索引值,继续在nodes属性中去深度递归,查找替换。如这个例子,我们取得是第一个nodes节点,那么他是一个children,那就意味着这个节点有一个子节点,该子节点是nodes属性数组索引为1得节点(注意这里得1是编程中的索引1,也即数组得第二个元素)。然后按照树得深度递归去查找直到,子节点均为直接渲染属性如mesh。
4.meshs字段:
按照第3步中的递归解析,最终解析到直接渲染元素如mesh,可以参照3中图示的那条mesh数据,它索引值为0,也即这个要渲染的mesh指向了meshs字段的第一个元素:
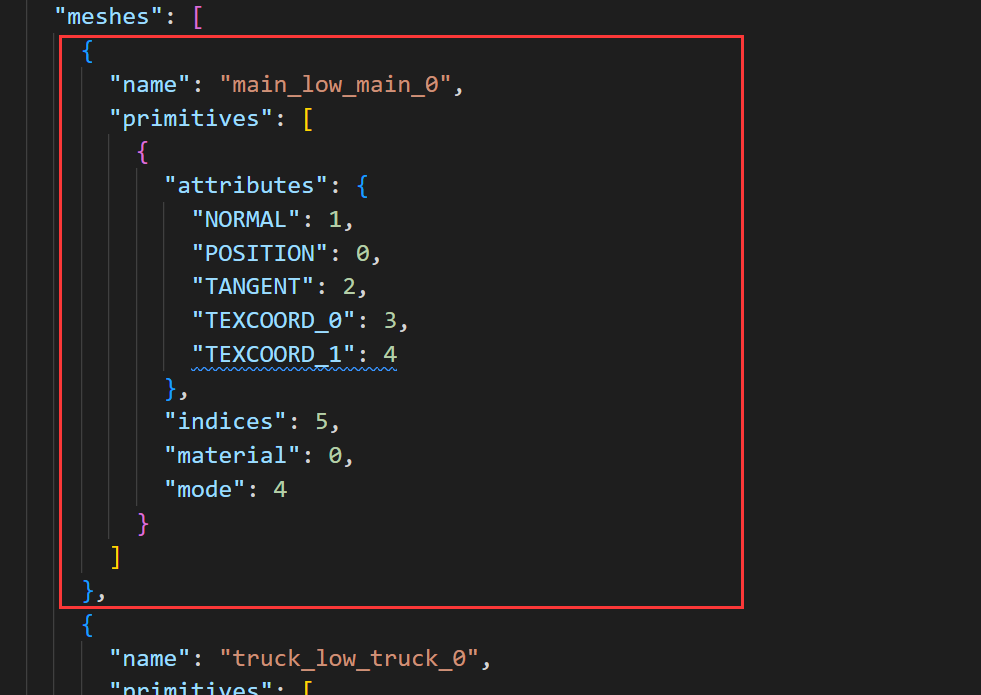 我们都知道,mesh主要应当包含的就是顶点数据,和材质。这个元素,attributes就描述了顶点数据,material就描述了材质信息。依旧按上述索引逻辑在相应的字段去找。这里可能要说明一下的就是,attributes属性的POSITION属性就是这个mesh顶点信息的索引值,该值对应accessors字段。
5.accessors字段:
在上例中POSITION属性值为0,则指向accessors字段的0号索引数据。
我们都知道,mesh主要应当包含的就是顶点数据,和材质。这个元素,attributes就描述了顶点数据,material就描述了材质信息。依旧按上述索引逻辑在相应的字段去找。这里可能要说明一下的就是,attributes属性的POSITION属性就是这个mesh顶点信息的索引值,该值对应accessors字段。
5.accessors字段:
在上例中POSITION属性值为0,则指向accessors字段的0号索引数据。
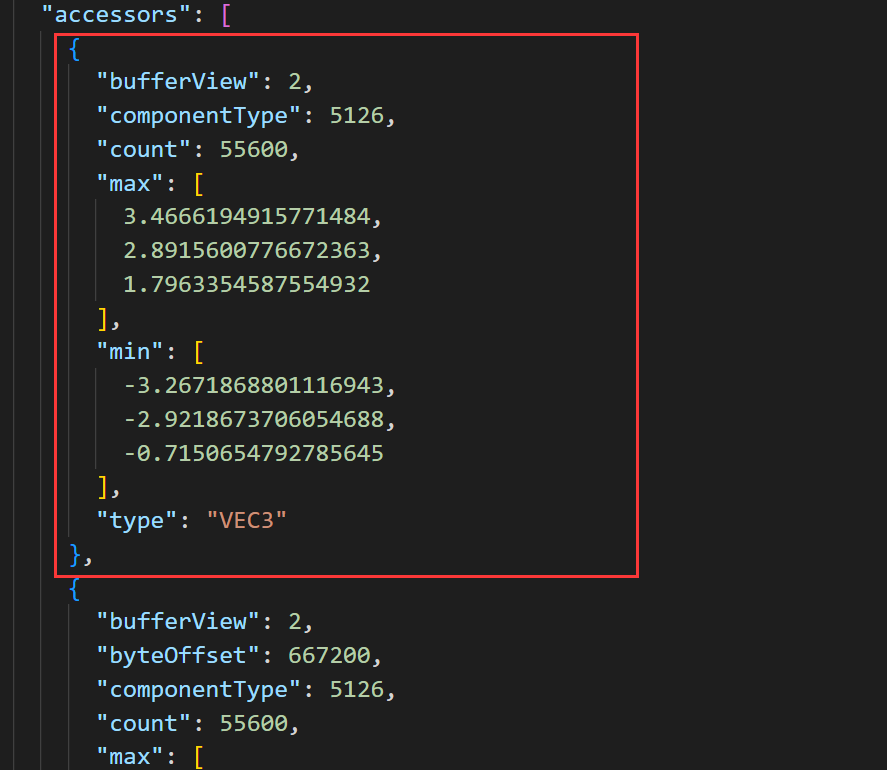
| bufferView | json中bufferView字段的索引 |
|---|---|
| componentType | 数据的类型,如:5120表示byte类型;5121表示ubyte类型;5122表示short类型;5123表示ushort类型;5124表示int类型;5125表示uint类型;5126表示float类型;5130表示double类型。 |
| count | 数据的个数 |
| type | 表示每个元素的数据类型。它可以是以下值之一: |
- "SCALAR":表示每个元素是标量(一个值)。
- "VEC2":表示每个元素是二维矢量。
- "VEC3":表示每个元素是三维矢量。
- "VEC4":表示每个元素是四维矢量。
- "MAT2":表示每个元素是2x2矩阵。
- "MAT3":表示每个元素是3x3矩阵。
- "MAT4":表示每个元素是4x4矩阵。 | | max | 指定每个分量的最大值。它是一个数字数组,其长度取决于type属性 | | min | 指定每个分量的最小值。它是一个数字数组,其长度取决于type属性 |
6.bufferview字段:
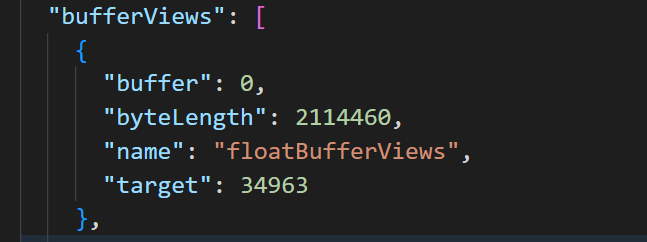 buffer属性为json的buffer字段的索引
7.buffer字段:
buffer属性为json的buffer字段的索引
7.buffer字段:
 uri就指向了最终顶点数据,以二进制形式存放在了scene.bin文件中。当然,也可以直接在里存放所有的二进制数据。
三、threejs源码又是如何执行这个流程的呢?
再把视线挪回GLTFParser.parse的源码,注意这几行源码:
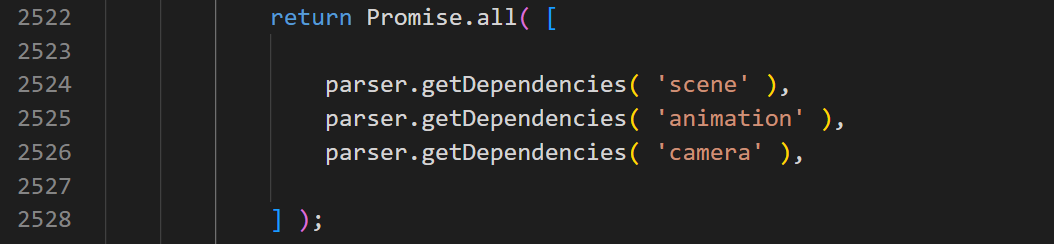 从函数名和传参你大概可以猜出,parser.getDependencies( 'scene' )就是递归解析场景数据的方法。沿着
GLTFParse.getDependencies->GLTFParse.getDependency的调用链你可以看到GLTFParse.getDependency源码实现如下:
从函数名和传参你大概可以猜出,parser.getDependencies( 'scene' )就是递归解析场景数据的方法。沿着
GLTFParse.getDependencies->GLTFParse.getDependency的调用链你可以看到GLTFParse.getDependency源码实现如下:
  1
  2
  3
  4
  5
  6
  7
  8
  9
 10
 11
 12
 13
 14
 15
 16
 17
 18
 19
 20
 21
 22
 23
 24
 25
 26
 27
 28
 29
 30
 31
 32
 33
 34
 35
 36
 37
 38
 39
 40
 41
 42
 43
 44
 45
 46
 47
 48
 49
 50
 51
 52
 53
 54
 55
 56
 57
 58
 59
 60
 61
 62
 63
 64
 65
 66
 67
 68
 69
 70
 71
 72
 73
 74
 75
 76
 77
 78
 79
 80
 81
 82
 83
 84
 85
 86
 87
 88
 89
 90
 91
 92
 93
 94
 95
 96
 97
 98
 99
100
101 getDependency( type, index ) {

        const cacheKey = type + ':' + index;
        let dependency = this.cache.get( cacheKey );

        if ( ! dependency ) {

            switch ( type ) {

                case 'scene':
                    dependency = this.loadScene( index );
                    break;

                case 'node':
                    dependency = this._invokeOne( function ( ext ) {

                        return ext.loadNode && ext.loadNode( index );

                    } );
                    break;

                case 'mesh':
                    dependency = this._invokeOne( function ( ext ) {

                        return ext.loadMesh && ext.loadMesh( index );

                    } );
                    break;

                case 'accessor':
                    dependency = this.loadAccessor( index );
                    break;

                case 'bufferView':
                    dependency = this._invokeOne( function ( ext ) {

                        return ext.loadBufferView && ext.loadBufferView( index );

                    } );
                    break;

                case 'buffer':
                    dependency = this.loadBuffer( index );
                    break;

                case 'material':
                    dependency = this._invokeOne( function ( ext ) {

                        return ext.loadMaterial && ext.loadMaterial( index );

                    } );
                    break;

                case 'texture':
                    dependency = this._invokeOne( function ( ext ) {

                        return ext.loadTexture && ext.loadTexture( index );

                    } );
                    break;

                case 'skin':
                    dependency = this.loadSkin( index );
                    break;

                case 'animation':
                    dependency = this._invokeOne( function ( ext ) {

                        return ext.loadAnimation && ext.loadAnimation( index );

                    } );
                    break;

                case 'camera':
                    dependency = this.loadCamera( index );
                    break;

                default:
                    dependency = this._invokeOne( function ( ext ) {

                        return ext != this && ext.getDependency && ext.getDependency( type, index );

                    } );

                    if ( ! dependency ) {

                        throw new Error( 'Unknown type: ' + type );

                    }

                    break;

            }

            this.cache.add( cacheKey, dependency );

        }

        return dependency;

    }
现在,有了前面对gltf文件的json格式讲解,switch分支内的每个case分支是什么含义你应该十分清楚了吧。最开始传参是scene,也就是解析场景,然后就产生了以下调用链: GLTFParse.getDependency('scene')->GLTFParse.loadScene()->GLTFParse.getDependency('node') ->GLTFParse.loadNode()->...(node递归)...->GLTFParse.getDependency('mesh') ->GLTFParse.loadGeometries->addPrimitiveAttributes->GLTFParser.getDependency( 'accessor') ->GLTFParser.loadAccessor()->GLTFParser.getDependency( 'bufferView')->GLTFParser.loadBufferView() ->GLTFParser.getDependency( 'buffer')->GLTFParser.loadBuffer() 这样层层调用最终读取到二进制顶点数据。并将其组装在mesh对象中,然后所有mesh对象按照gltf的层级结构组成整个场景对象。mesh对象中的geometry属性有很多的buffertrribute,代表了这些数据缓冲区,如position为顶点缓冲区,uv为纹理映射坐标缓冲区,color为片段着色器颜色缓冲区等等。而loadMatarial则将uv缓冲区放进了geometry中,以及在material中存放了纹理资源。